Porto (Software Architectural Pattern)
Welcome to Porto
- Introduction
- Layers
- Components
- Main Components Definitions & Principles
- Typical Container Structure
- Implementations
- Feedback & Questions
Introduction
Porto SAP is a modern Software Architectural Pattern, designed to help developers organize their Code in a highly maintainable way. Its main goal is to organize the business logic in a reusable way.
Porto is a great alternatives to the standard MVC, for large and long term projects, as they tend to have higher complexity over time.
Porto inherits concepts from the MVC, DDD, ADR, Modular and Layered architectures. And it adheres to a list of convenient design principles such as SOLID, OOP, LIFT, DRY, CoC, GRASP, Generalization, High Cohesion and Low Coupling.
Porto started as an experimental architecture, trying to solve the common problems developers face, when building medium to large web projects. While all modular architectures focuses on the reusability of the framework general functionality, Porto focuses on the reusability of the business logic itself.
“Simplicity is prerequisite for reliability.” — Edsger Dijkstra
Feedbacks & Contributions are welcomed and credited.
Let’s make the developer’s lives easier.
Quality Attributes:
Advantages of using Porto:
- Reusability of business logic (Containers) across multiple similar projects.
- Easy to maintain and test (quickly modify existing features and debug your code).
- Zero technical debt (low communication between developers).
- Pluggable optional UI’s in each Container, (start with Web App now and build an API later, or the opposite).
- Decoupled code (editing X doesn’t break Y).
- Separated business logic in multiple Container.
- Scalable code (easy to modify and implement new features).
- Easy framework upgrade (complete separation between the App and the framework via the Ship layer).
- Easy to locate any feature/functionality. And to understand what’s happening inside it.
- Organized coupling between the internal classes “Components”.
- Slim classes “treating classes as functions” (extremely adhering to the single responsibility principle).
- Uses the domain expert language when naming the classes “components”.
- Clear development workflow with predefined data flow and dependencies direction.
- Very organized code base with zero code decoupling.
- Easy to understand by any developer (no magic).
Porto Benefits:
Decoupling
Separation of concerns, is an important principle Porto adheres to.
Thus the application code is separated from the framework code.
The business logic is wrapped in different Containers. And Containers are groupped into Sections (each Section contains a portion of your application business logic).
Containers are separated from the infrastructure code (Parent classes and Utility Code), within the Application itself. The infrastructure logic lives in the Ship layer far from the Cointainer Layer which can contain Containers at its root or can group related Containers into Sections.
The UI’s (user interfaces) are separated from the application business logic and separated from each others within each Container.
Making the UI’s (WEB, API & CLI) pluggable, allows writting the business logic of your application first, then implement a UI to interact with your code. It also gives flexibility to supporting interfaces when needed (example: start with Web interface then open an API later), with the least effort possible. This is all possible because the Actions are the central organizing principle “not the controller” which are shared across multiple UI’s.
Code Levels:
- Low-level code: the framework code (implements basic operations like reading files from a disk, or interacting with a database). Usually lives in the Vendor directory.
- Mid-level code: the application general code (implements functionality that serves the High-level code. And it relies on the Low-level code to function). Should be in the App/Ship directory.
- High-level code: the business logic code (encapsulates complex logic and relies on the Mid-level code to function). Should be in the App/Containers directory.
Modularity
In Porto, your application business logic lives in Containers (same as Modules & Domains & Layers) and interact with other Containers in pre-defined directions.
In Porto, Containers are similar in concept to Modules (from a Modular architecture). However, Containers in Porto do cross the boundaries of a Module, due to the fact that they contain business logic which by nature involves a lot of dependencies and communications.
At the core, Models have relationships with Models from different Containers. And Actions can call Tasks and SubActions from other Containers. It’s the responsibility of the developer to minimize the relationships between the Containers, while Porto’s rules and guidelines will help achieving that.
In terms of dependency management, the developer is free to move each Container to its own repository or keep all Containers together under single management.
Porto benefits from both worlds it applies concepts from the Modular world in the simple Monolithic world.
Testability
Porto supports and encourage writing functional and unit tests. It’s structure helps writing tests, and easily know what each test is testing. Porto comes with tests folders at the root of each Container mainly for unit tests, and a functional tests folder in each UI folder, to test each UI separately.
Following the principles as advised will ensure you have easily testable code, for each piece of code without extra effort.
Search-ability
One of the biggest advantages of Porto, is the speed of finding a piece of code in a large code base.
Usually, developers build classes with set of related functions. And then start making calls between those functions of different classes. The bigger the code gets the harder it becomes to find a specific function or track a feature down.
In Porto the biggest class consist of single function and it’s always having the same name run.
This allows you to find any Use Case (Action) in your code by just browsing the files.
In Porto you can find any feature implementation in less than 3 seconds! (example: if you are looking for where the user address is being validated - just go to the Address Container, open the list of Actions and search for ValidateUserAddressAction).
Extensibility
Porto’s takes future growth into consideration and it ensures your code remains maintainable no matter how the project size become. It achieves this by its modular structure, and separation of concerns.
Layers
At its core Porto consists of 2 layers “folders” Containers & Ship.
These layers can be created anywhere inside any framework of choice.
(example: in Laravel PHP you can put them in the app/ directory or create an src/ directory on the root)
The high-level code (Application Business Logic), should be placed in the Container Layer. While the mid-level code should be placed in the Ship Layer.
The Containers (high-level code) relies indirectly on the Ship (low-level code) to function, through the Ship layer (mid-level code). But not the opposite.
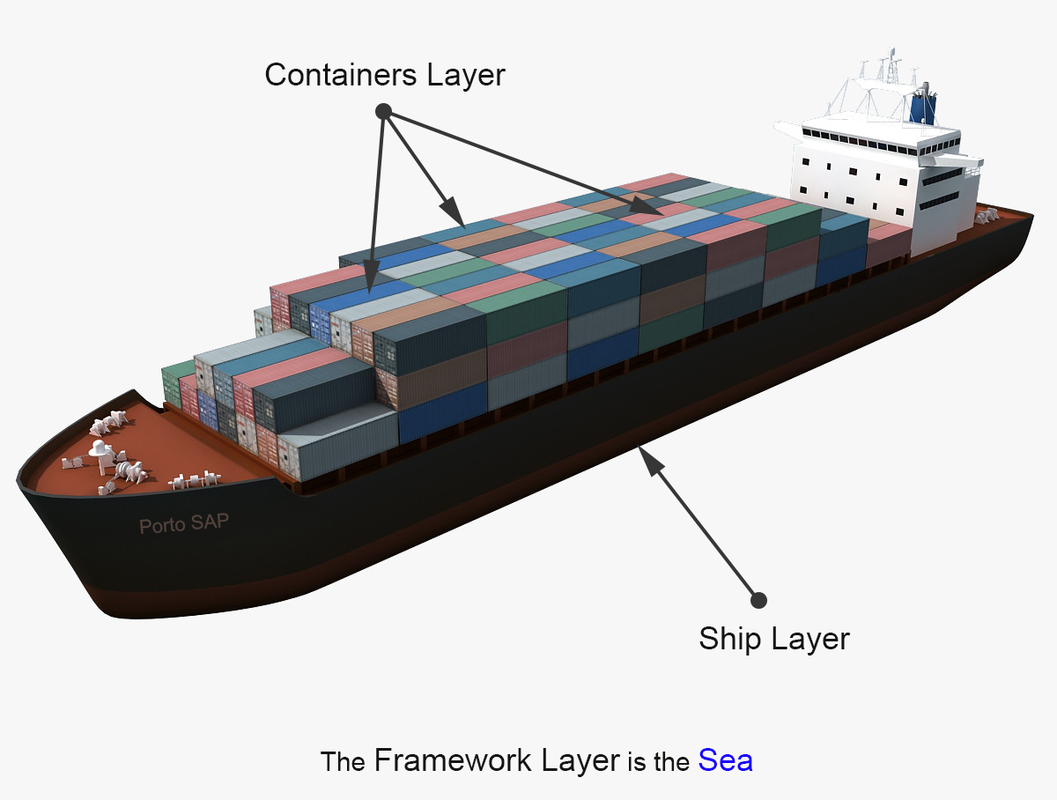
Layers Diagram
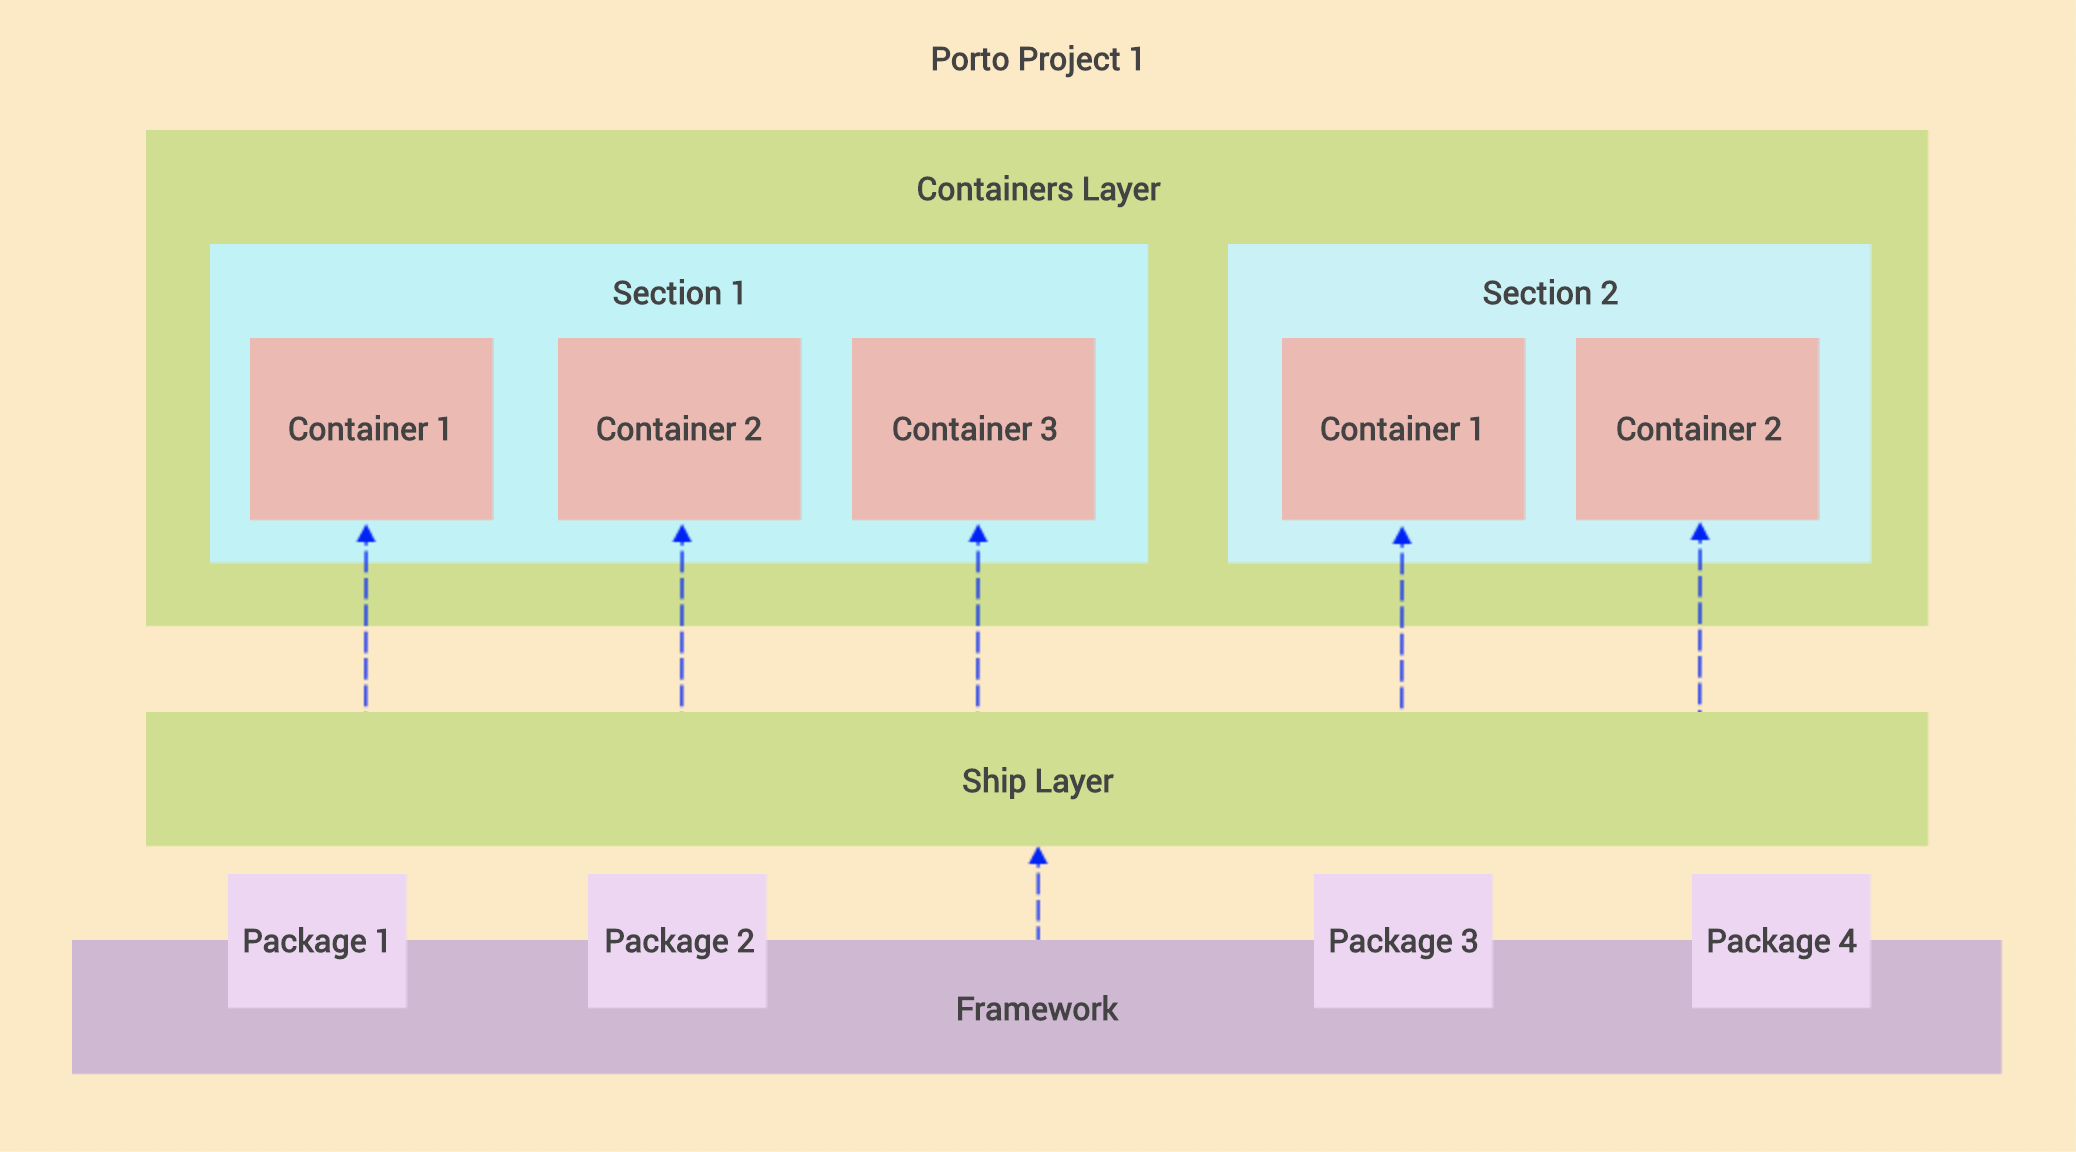
Visual Image:
Ship Layer:
The Ship layer, contains the Parent “Base” classes (classes extended by every single component) and some Utility Code (helper functions and more).
The Parent classes “Base classes” of Ship layer gives full control over the Container’s Components (for example adding a function to the Base Model class, makes it available in every Model in your Containers).
The Ship layer, also plays an important role in separating the Application code from the Framework code. Which facilitates upgrading the Framework without affecting the Application code.
In Porto the Ship layer is very slim, it does NOT contain common reusable functionalities such as Authentication or Authorization, since all these functionalities are provided by Containers, to be replaced whenever needed.
The Ship layer can hold two different types of code. 1) The Containers shared code (including all parent classes, general classes and reusable code). 2) The Core code (code contains the logic that autoloads the container components). It’s highly recommended to separate this Core from the actual framework and make it an external package, in order to hide the internal framework magic from the custom Application code.
Ship Structure
The Ship, contains:
- Core: is the engine that auto-register and auto-load all your Container’s Components to boots your Application. It contains most of the magical code that handles everything that is not part of your business logic. And mostly contains code that facilitate the development by extending the framework features.
- Parents: contains parent classes for each Component in your Container. (Adding functions to the parent classes makes them available in every Container). Parents are made to contain shared code between your Containers.
- Other Folders: each of the other folders provide reusable features and classes to be used by all Containers. Such as, Global Exceptions, Application Middleware’s, Global Config files, etc.
Note: All the Container’s Components MUST extend or inherit from the Ship layer (in particular the Parent’s folder).
When separating the Core to an external package, the Ship Parents should extend from the Core Parents (can be named Abstract, since most of the them supposed to be Abstract Classes). The Ship Parents holds your custom Application shared business logic, while the Core Parents (Abstracts) holds your framework common code, basically anything that is not business logic should be hidden from the actual Application being developed.
Containers Layer:
The Containers layer is where the Application specific business logic lives (Application functionalities).
Containers are wrappers of business logic.
Here’s an example of how to decide creating Containers. “In a TODO App the Task, User and Calendar… each would be in their own Container, were each has its own Routes, Controllers, Models, Exceptions, etc. And each Container is responsible for receiving requests and returning responses from whichever UI (Web, API..) it supports.”
It’s advised to use Single Model per Container, however in some cases you may need more. Just keep in mind two Models means two Repositories, two Transformers, etc. Unless you want to use both Models always together, do split them into 2 Containers.
Basic Containers Structure:
Container 1
	├── Actions
	├── Tasks
	├── Models
	└── UI
	    ├── WEB
	    │   ├── Routes
	    │   ├── Controllers
	    │   └── Views
	    ├── API
	    │   ├── Routes
	    │   ├── Controllers
	    │   └── Transformers
	    └── CLI
	        ├── Routes
	        └── Commands

Container 2
	├── Actions
	├── Tasks
	├── Models
	└── UI
	    ├── WEB
	    │   ├── Routes
	    │   ├── Controllers
	    │   └── Views
	    ├── API
	    │   ├── Routes
	    │   ├── Controllers
	    │   └── Transformers
	    └── CLI
	        ├── Routes
	        └── Commands
Interactions between Containers
- A Container MAY depends on one or many other Containers.
- A Controller MAY call Tasks from another Container.
- A Model MAY have a relationship with a Model from other Containers.
- Other forms of communications are also possible, such as Listening to Events fired by other Containers.
Note: If you’re not familiar with separating your code into Modules/Domains, or for some reason you don’t prefer that approach. You can create your entire Application in a single Container. (Not recommended but absolutely possible).
Containers Sections
Container Sections are another very important aspect in the Porto architecture.
To avoid having tens of containers on the root of your containers folder, you can group related Containers into Sections.
The basic definition of a Section is a folder that contains related Containers. However the benifits are huge. Think of Sections as bounded context, where each section represents a portion of your system.
Example: if you’re building a racing game like Need for Speed, you may have the following two sections: the Race Section and the Lobby Section, where each section contains a Car Container and a Car Model inside it, but with different properties and functions. In this example the Car Model of the Race section can contain the business logic for accelerating and controlling the car, while the Car Model of the Lobby Section contains the business logic for customizaing the car before the race.
Sections allows separating large Model into smaller ones. And they can provide boundaries for different Models in your system.
If you prefer simplicity or you have only single team working on the project, you can have no Sections at all (where all Containers live in the containers folder) which means your project is a single section. In this case if the project grew quickly and you decided you need to start using sections, you can make a new project also with a single section, this is known as Micro-Services. In Micro-Services each section “project portion” live in its own project (repository) and they can communicate over the network usually using the HTTP protocol.
Components
In the Container layer there’s a set of Components “Classes” with predefined responsibilities.
Every single piece of code you write should live in a Component (class function). Porto defines a huge list of those Components for you, with a set guidelines to follow when using them, to keep the development process smooth.
Components Categories
Every Container consists of a number of Components, in Porto the Components are split into two categories:
Main Components and
Optional Components.
Main Components:
You must use these Components as they are essential for almost all types of Web Apps:
Routes - Controllers - Requests - Actions - Tasks - Models - Views - Transformers.
Views: should be used in case the App serves HTML pages.
Transformers: should be used in case the App serves JSON or XML data.
Main Components Interaction Diagram
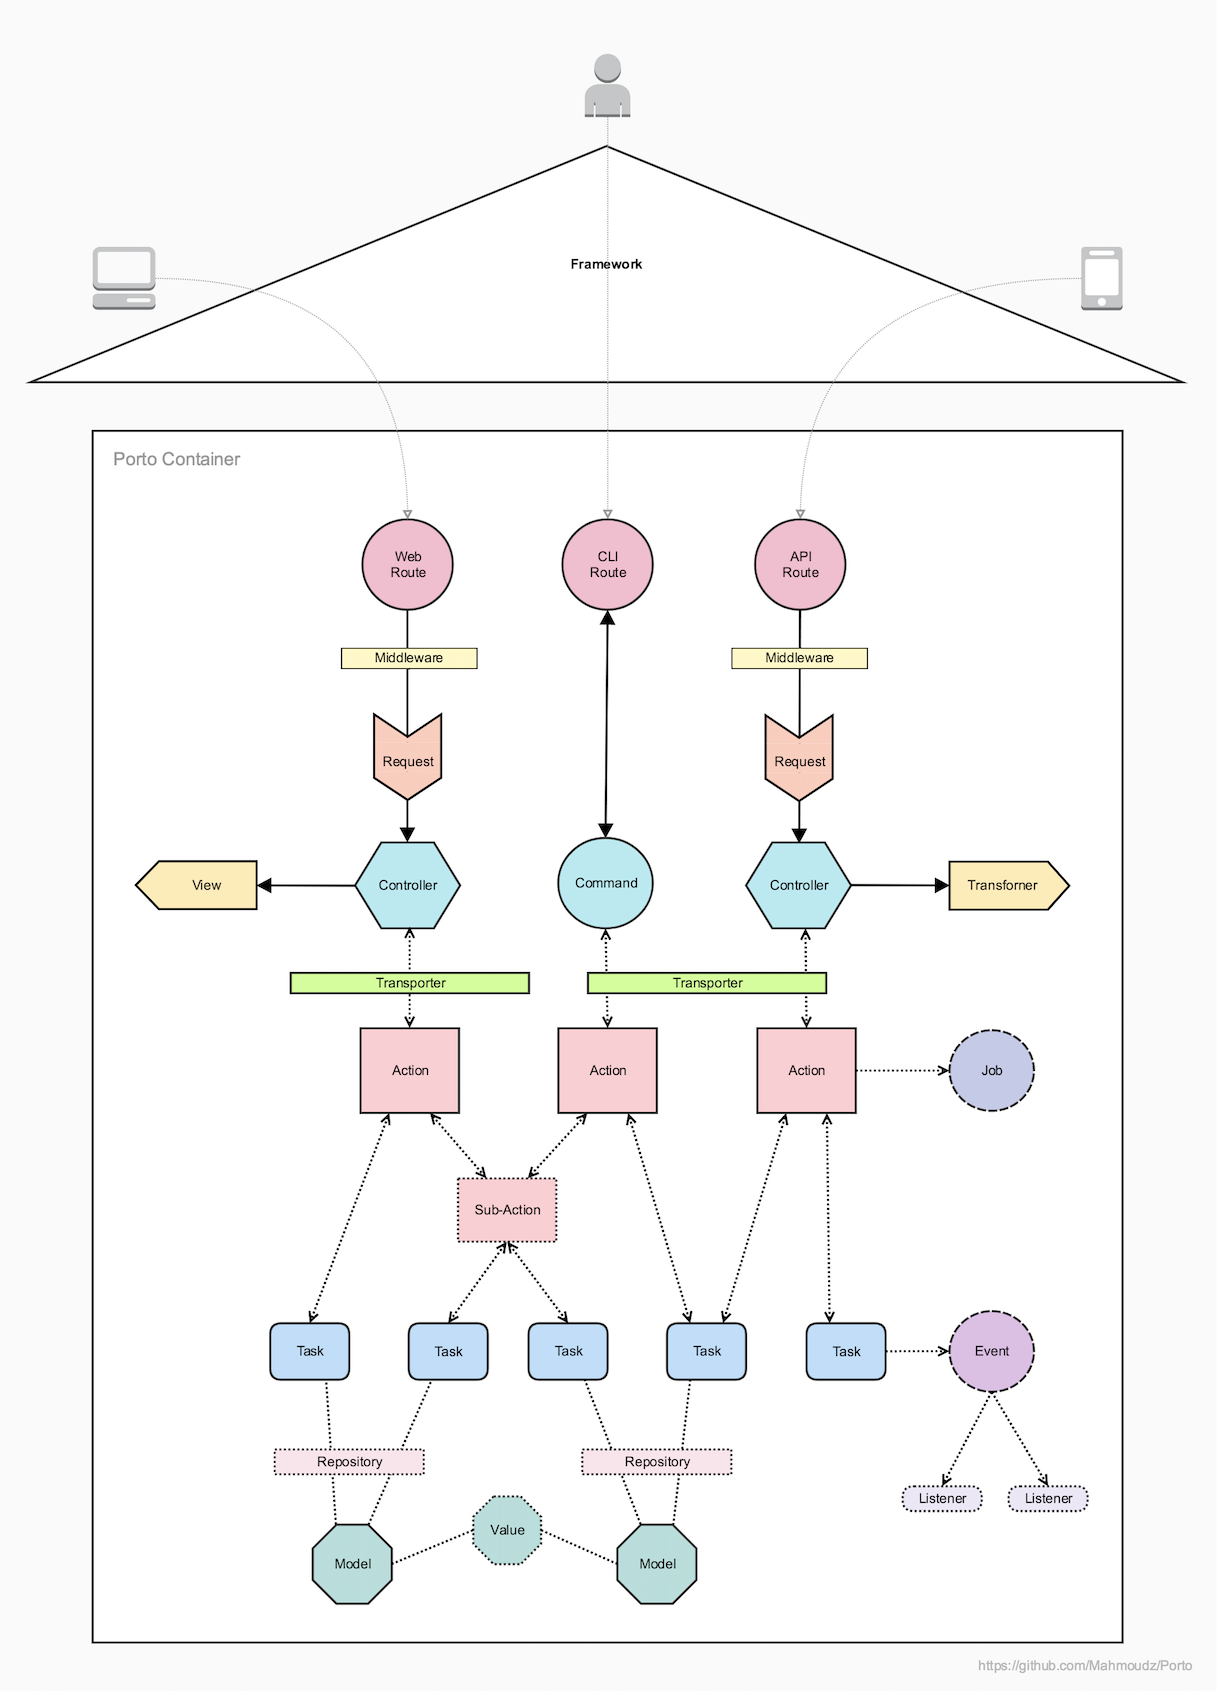
Request Life Cycle
A typical very basic API call scenario:
- User calls an
Endpointin aRoutefile. Endpointcalls aMiddlewareto handle the Authentication.Endpointcalls itsControllerfunction.Requestinjected in theControllerautomatically applies the request validation & authorization rules.Controllercalls anActionand pass eachRequestdata to it.Actiondo the business logic, OR can call as manyTasksas needed to do the reusable subsets of the business logic.Tasksdo a reusable subsets of the business logic (ATaskcan do a single portion of the main Action).Actionprepares data to be returned to theController, some data can be collected from theTasks.Controllerbuilds the response using aView(orTransformer) and send it back to the User.
Optional Components:
You can add these Components when you need them, based on your App needs, however some of them are highly recommended:
Repositories - Exceptions - Criteria - Policies - Tests - Middlewares - Service Providers - Events - Listeners - Commands - Migrations - Seeders - Factories - Contracts - Traits - Jobs - Values - Transporters - Mails - Notifications…
Main Components Definitions & Principles
Below is the explanation of the roles, usage and principles of each Main Component.
Routes
Routes are the first receivers of the HTTP requests.
The Routes are responsible for mapping all the incoming HTTP requests to their controller’s functions.
The Routes files contain Endpoints (URL patterns that identify the incoming request).
When an HTTP request hits your Application, the Endpoints match with the URL pattern and make the call to the corresponding Controller function.
Principles:
- There are three types of Routes, API Routes, Web Routes and CLI Routes.
- The API Routes files SHOULD be separated from the Web Routes files, each in its own folder.
- The Web Routes folder will contain only the Web Endpoints, (accessible by Web browsers); And the API Routes folder will contain only the API Endpoints, (accessible by any consumer App).
- Every Container SHOULD have its own Routes.
- Every Route file SHOULD contain a single Endpoint.
- The Endpoint job is to call a function on the corresponding Controller once a request of any type is made. (It SHOULD NOT do anything else).
Controllers
Controllers are responsible for validating the request, serving the request data and building a response. Validation and response, happens in separate classes, but triggered from the Controller.
The Controllers concept is the same as in MVC (They are the C in MVC), but with limited and predefined responsibilities.
Principles:
- Controllers SHOULD NOT know anything about the business logic or about any business object.
- A Controller SHOULD only do the following jobs:
- Reading a Request data (user input)
- Calling an Action (and passing request data to it)
- Building a Response (usually build response based on the data collected from the Action call)
- Controllers SHOULD NOT have any form of business logic. (It SHOULD call an Action to perform the business logic).
- Controllers SHOULD NOT call Container Tasks. They MAY only call Actions. (And then Actions can call Container Tasks).
- Controllers CAN be called by Routes Endpoints only.
- Every Container UI folder (Web, API, CLI) will have its own Controllers.
You may wonder why we need the Controller! when we can directly call the Action from the Route. The Controller layer helps making the Action reusable in multiple UI’s (Web & API), since it doesn’t build a response, and that reduces the amount of code duplication accross different UI’s.
Here’s an example below:
- UI (Web): Route
W-R1-> ControllerW-C1-> ActionA1. - UI (API): Route
A-R1-> ControllerA-C1-> ActionA1.
As you can see in the example above the Action A1 was used by both routes W-R1 and A-R1, with the help of the Controllers layer that lives in each UI.
Requests
Requests mainly serve the user input in the application. And they are very useful to automatically apply the Validation and Authorization rules.
Requests are the best place to apply validations, since the validations rules will be related to every request. Requests can also check the Authorization, e.g. check if this user has access to this controller function. (Example: check if a specific user owns a product before deleting it, or check if this user is an admin to edit something).
Principles:
- A Request MAY hold the Validation / Authorization rules.
- Requests SHOULD only be injected in Controllers. Once injected they automatically check if the request data matches the validation rules, and if the request input is not valid an Exception will be thrown.
- Requests MAY also be used for authorization, they can check if the user is authorized to make a request.
Actions
Actions represent the Use Cases of the Application (the actions that can be taken by a User or a Software in the Application).
Actions CAN hold business logic or/and they orchestrate the Tasks to perform the business logic.
Actions take data structures as inputs, manipulates them according to the business rules internally or through some Tasks, then output a new data structures.
Actions SHOULD NOT care how the Data is gathered, or how it will be represented.
By just looking at the Actions folder of a Container, you can determine what Use Cases (features) your Container provides. And by looking at all the Actions you can tell what an Application can do.
Principles:
- Every Action SHOULD be responsible for doing a single Use Case in the Application.
- An Action MAY retrieves data from Tasks and pass data to another Task.
- An Action MAY call multiple Tasks. (They can even call Tasks from other Containers as well!).
- Actions MAY return data to the Controller.
- Actions SHOULD NOT return a response. (The Controller’s job is to return a response).
- An Action SHOULD NOT call another Action (If you need to reuse a big chunk of business logic in multiple Actions, and this chunk is calling some Tasks, you can create a SubAction). See the SubAction section below.
- Actions are mainly used from Controllers. However, they can be used from Events Listeners, Commands and/or other Classes. But they SHOULD NOT be used from Tasks.
- Every Action SHOULD have only a single function named
run(). - The Action main function
run()can accept a Request Object in the parameter.
Tasks
The Tasks are the classes that hold the shared business logic between multiple Actions accross different Containers.
Every Task is responsible for a small part of the logic.
Tasks are optional, but in most cases you find yourself in need for them.
Example: if you have Action 1 that needs to find a record by its ID from the DB, then fires an Event. And you have an Action 2 that needs to find the same record by its ID, then makes a call to an external API. Since both actions are performing the “find a record by ID” logic, we can take that business logic and put it in it’s own class, that class is the Task. This Task is now reusable by both Actions and any other Action you might create in the future.
The rule is, whenever you see the possibility of reusing a piece of code from an Action, you should put that piece of code in a Task. Do not blindly create Tasks for everything, you can always start with writing all the business logic in an Action and only when you need to reuse it, create an a dedicated Task for it. (Refactoring is essential to adapt to the code growth).
Principles:
- Every Task SHOULD have a single responsibility (job).
- A Task MAY receive and return Data. (Task SHOULD NOT return a response, the Controller’s job is to return a response).
- A Task SHOULD NOT call another Task. Because that will takes us back to the Services Architecture and it’s a big mess.
- A Task SHOULD NOT call an Action. Because your code wouldn’t make any logical sense then!
- Tasks SHOULD only be called from Actions. (They could be called from Actions of other Containers as well!).
- Tasks usually have a single function
run(). However, they can have more functions with explicit names if needed. Making the Task class replace the ugly concept of function flags. Example: theFindUserTaskcan have 2 functionsbyIdandbyEmail, all internal functions MUST call therunfunction. In this example theruncan be called at the end of both funtions, after appending Criteria to the repository. - A Task SHOULD NOT be called from Controller. Because this leads to non-documented features in your code. It’s totally fine to have a lot of Actions “example:
FindUserByIdActionandFindUserByEmailActionwhere both Actions are calling the same Task” as well as it’s totally fine to have single ActionFindUserActionmaking a decision to which Task it should call. - A Task SHOULD NOT accept a Request object in any of its functions. It can take anything in its funtions parameters but never a Request object. This will keep free to use from anwyhere, and can be tested independently.
Models
The Models provide an abstraction for the data, they represent the data in the database. (They are the M in MVC).
Models are responsible for how the data should be handled. They make sure that data arrives properly into the backend store (e.g. Database).
Principles:
- A Model SHOULD NOT hold business logic, it can only hold the code and data the represents itself. (it’s relationships with other models, hidden fields, table name, fillable attributes,…)
- A single Container MAY contains multiple Models.
- A Model MAY define the Relations between itself and any other Models (in case a relation exist).
Views
Views contain the HTML served by your application.
Their main goal is to separate the application logic from the presentation logic. (They are the V in MVC).
Principles:
- Views can only be used from the Web Controllers.
- Views SHOULD be separated into multiple files and folders based on what they display.
- A single Container MAY contains multiple Views files.
Transformers
Transformers (are the short name for Responses Transformers).
They are equivalent to Views but for JSON Responses. While Views takes data and represent it in HTML, Transformers takes data and represent it in JSON.
Transformers are classes responsible for transforming Models into Arrays.
Transformers takes a Model or a group of Models “Collection” and converts it to a formatted serializable Array.
Principles:
- All API responses MUST be formatted via Transformers.
- Every Model (that gets returned by an API call) SHOULD have a Transformer.
- A single Container MAY have multiple Transformers.
- Usually every Model would have a Transformer.
Sub-Actions
SubActions are designed eliminate code duplication in Actions. Don’t get confused! SubActions do not replace Tasks.
While Tasks allows Actions to share a piece of functionality. SubActions allows Actions to share a sequence of Tasks.
The SubActions are created to solve a problem. The problem is: Sometimes you need to reuse a big chunk of business logic in multiple Actions. That chunk of code is already calling some Tasks. (Remember a Task SHOULD NOT call other Tasks) so how shall you reuse that chunk of code without creating a Task! The solution is create a SubAction.
Detailed Example: assuming an Action A1 is calling Task1, Task2 and Task3. And another Action A2 is calling Task2, Task3, Task4 and Task5. Notice both Actions are calling Tasks 2 and 3. To eliminate code duplication we can create a SubAction that contains all the common code between both Actions.
Principles:
- Sub-Actions MUST call Tasks. If a Sub-Actions is doing all the business logic, without the help of at least 1 Tasks, it probably shouldn’t be a Sub-Action but a Task instead.
- A Sub-Action MAY retrieves data from Tasks and pass data to another Task.
- A Sub-Action MAY call multiple Tasks. (They can even call Tasks from other Containers as well!).
- Sub-Actions MAY return data to the Action.
- Sub-Action SHOULD NOT return a response. (the Controller job is to return a response).
- Sub-Action SHOULD NOT call another Sub-Action. (try to avoid that as much as possible).
- Sub-Action SHOULD be used from Actions. However, they can be used from Events, Commands and/or other Classes. But they SHOULD NOT be used from Controllers or Tasks.
- Every Sub-Action SHOULD have only a single function named
run().
Typical Container Structure:
Container
	├── Actions
	├── Tasks
	├── Models
	├── Values
	├── Events
	├── Listeners
	├── Policies
	├── Exceptions
	├── Contracts
	├── Traits
	├── Jobs
	├── Notifications
	├── Providers
	├── Configs
	├── Mails
	│   ├── Templates
	├── Data
	│   ├── Migrations
	│   ├── Seeders
	│   ├── Factories
	│   ├── Criteria
	│   ├── Repositories
	│   ├── Validators
	│   ├── Transporters
	│   └── Rules
	├── Tests
	│   ├── Unit
	│   └── Traits
	└── UI
	    ├── API
	    │   ├── Routes
	    │   ├── Controllers
	    │   ├── Requests
	    │   ├── Transformers
	    │   └── Tests
	    │       └── Functional
	    ├── WEB
	    │   ├── Routes
	    │   ├── Controllers
	    │   ├── Requests
	    │   ├── Views
	    │   └── Tests
	    │       └── Acceptance
	    └── CLI
	        ├── Routes
	        ├── Commands
	        └── Tests
	            └── Functional
Implementations
Ready to see the implementions!
- PHP
- apiato (A flawless framework for building scalable and testable API-Centric Apps in PHP.) Built with Laravel.
- expressive-porto (An implementation of the PORTO architecture with Zend.) Built with Zend-Expressive.
- JavaScript
- Python
- Java
- C#
Submit yours.
Get in Touch
Your feedback helps.
For feedbacks, questions or suggestions? We are on Slack.
![]()
Credits
| Authors | Site | ||
|---|---|---|---|
| Mahmoud Zalt | @Mahmoud_Zalt | zalt.me | [email protected] |
Donations
![]()
![]()

License
The MIT License (MIT).